How to create a custom lint rule for Flutter
Posted on Medium on 29 September 2023
A while ago, I read about the custom_lint package and how it can facilitate the development of new linter rules. So, I got excited and jumped straight into it to try writing my own rule for Flutter to clean up some code smells that were bothering me in some projects. And once I was done, I wrote about my excitement in accomplishing this task and why I did it, but not how.
As soon as I started, I faced some roadblocks. The first one was going through the official documentation that was (and at the time I’m writing this, still is) outdated. There were some major API changes (see changelog for version 0.1.0 and 0.2.0), which is understandable, given that the package has not reached version 1.0.0 yet.
I then thought, not a problem, I’ll just use the good old red-green-refactor mantra of Test-Driven Development (TDD 💙) to make slow and steady progress. First I’ll specify what I want the linter to do by writing tests. These tests will fail, this is the red phase! Then our objective is to make these tests pass, achieve the green phase! To do this, we must hack a solution, and finally, refactor! Here comes the second problem: how do you test a linter rule? I mean, the analyzer is kind of meta; we are interested in matching our logic to code that is not running, right? It’s gotta be hard to do!
Actually, no, it’s not! It turns out we have a live debugging session (don’t worry, we will have tests as well) with a magic hot reload feature: the analysis server itself!
So, let’s see what that really looks like.
Goal
As I explained in my previous post, the target of my linter rule was string literals inside widgets. A basic premise I wanted to test with this rule is that most time someone hard-code a string in a widget, it is due to one of these two reasons:
- Lack of abstraction; commonly a value used for comparison, which should have been an enum
- Unmaintainable presentation code; it will take a lot of effort whenever l10n becomes a requirement For better understanding, an example of what I mean by unmaintainable presentation code is:
@override
Widget build(BuildContext context) {
  // this is unmaintainable; what if we wanted to add translations?
  return const Text('Hello, world!');
}
If one day we decide to add support for another language, we have to refactor our entire codebase. The proper way of doing it (and we should be doing from the beginning) is described on the official documentation:
Widget build(BuildContext context){
  // Example taken from flutter docs. The text should update its message
  // according to the system locale of the target platform.
  // Switching between locales should cause this text to update.
  return Text(AppLocalizations.of(context)!.helloWorld)
}
Hence, as a way of enforcing this practice, I decided to create a custom lint as described on the following steps.
Create the project
We start by creating a Dart package; Optionally, using very_good_cli for more out-of-the-box features.
dart create -t package flutter_sane_lints
Then we add the dependencies we need - analyzer and custom_lint_builder:
dart pub add analyzer custom_lint_builder
And we take this opportunity to create another project for our debugging, or turn our example directory into a guinea pig, by creating a flutter app. Remember, this is not a real project necessarily, so it is not important to be a running app:
flutter create -t app lint_consumer
Then, it is important to add our custom lint rule and custom_lint as dev dependencies to this test project, and enable custom_lint on the analysis_options.yaml:
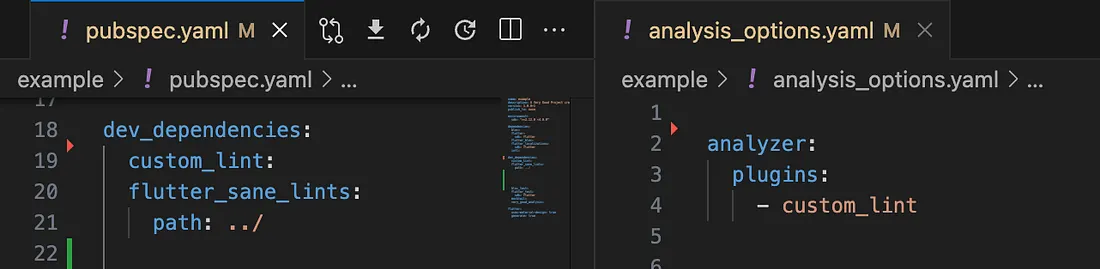
Activating custom_lint on the test project
At this point we should have a Flutter app without any linter warnings. This is our baseline for creating test cases. This is green, all zero tests are passing.
Red
The first step on the TDD method is to start defining test cases without making them pass. As a matter of fact, starting small with a single case will do. How? Using the sub-project, we start creating the undesired problems to be targeted with the custom rule and mark them with the expect_lint annotation, as recommended by the official documentation here.
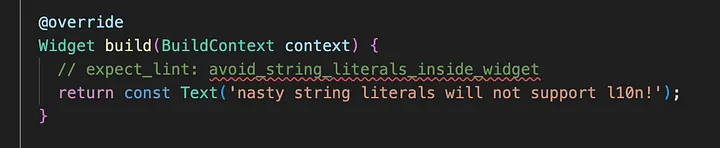
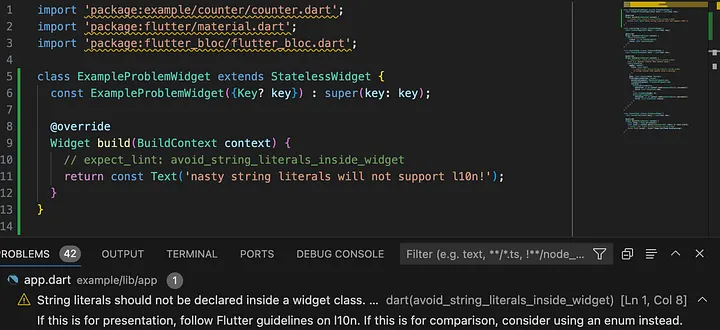
Using the example from earlier, the first case becomes:
@override
Widget build(BuildContext context) {
  // expect_lint: avoid_string_literals_inside_widget
  return const Text('nasty string literals will not support l10n!');
}
So, now it’s time to “run” the test and see it failing. That is, it’s time to reload the sub-project with a pub get (sometimes also restart the analysis server, as it can be a little flaky) and see the lint failing to match the expect_lint annotation:
expect_lint will display a warning if it is not matched
We have a warning on the analysis server, so our test is failing. This means red.
Green
Up to this point we have set up our project, but we haven’t really implemented anything yet. It’s about time we start.
Firstly, we create the entry point for our plugin, the createPlugin() top-level function that must be exported on our package API:
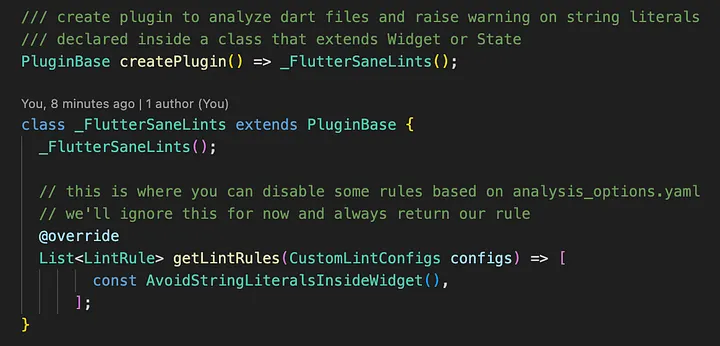
Custom lint plugin entry point
And we create the LintRule class that we defined on the method above:
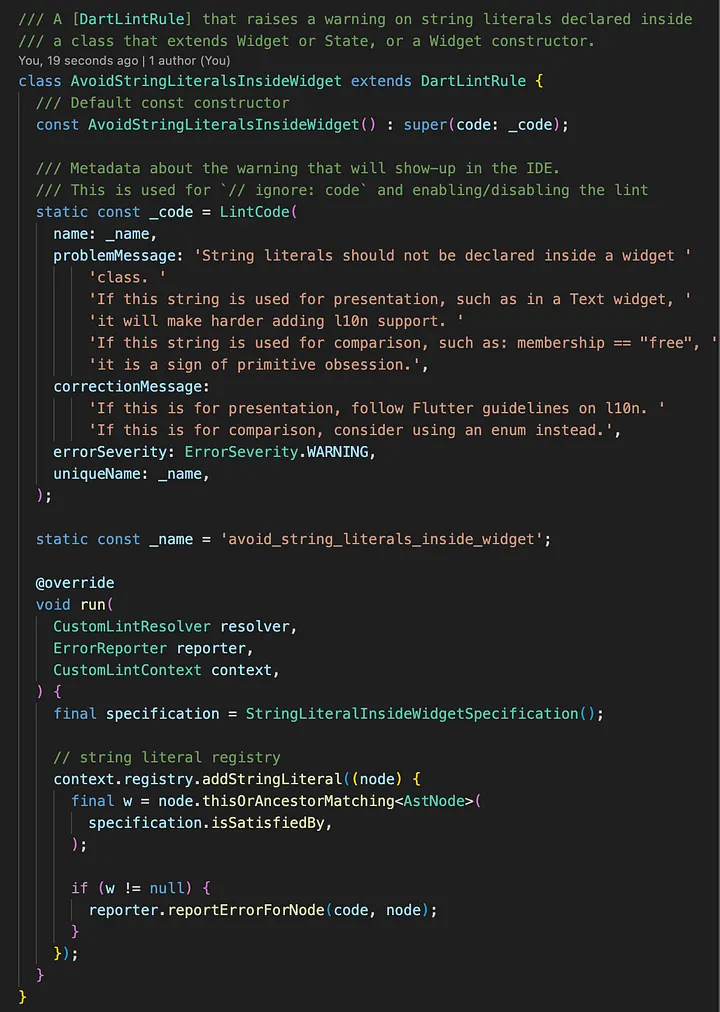
A DartLintRule class definition that will be used by the plugin
There is a lot happening here, so let’s unpack this. We have:
- A class definition extending DartLintRule to be used by the analyzer plugin
- A constructor without arguments that passes a const LintCode to super()
- The constant code (LintCode) & name (String) passed to the constructor
- The run() method, that will receive the lint context and resolver, in order to add matchers to the registry and, ultimately, report errors.
- Within the run() method, we’re using the Specification Pattern, from Domain-Driven Design (DDD 💙), to move the AstNode analysis logic elsewhere
- The specification being passed to a registry.addStringLiteral() callback function that is executed by the analyzer plugin on every string literal
- A call to reporter.reportErrorForNode in case the analyzed node (or ancestor) matches the specification.
The last 2 points show the magic sauce of the custom_lint package. We don’t need to identify if a token is a string literal or where it is. The plugin does it for us and the reporter will handle raising it.
Attempt #1
Those familiar with TDD will not be surprised by the first solution attempt I’ll present here. Remember, we need to satisfy only one test case we have right now to get back to green, so we’ll do the most basic and obvious implementation to get it passing again:
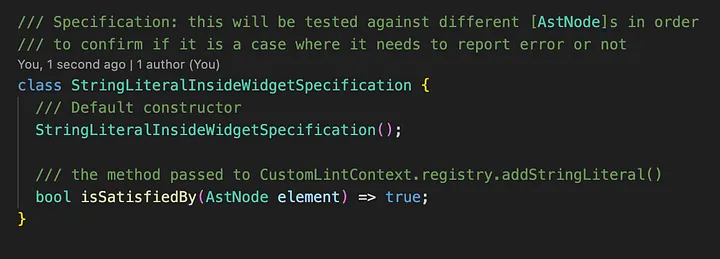
A basic initial attempt to get our single test passing
Yes, if you think returning true on every string literal will not be the solution, you are right. This will raise a lot of false positive cases, such as strings used in serialization or l10n (generated) code that is correctly placed out of your UI, and even imports! The latter immediately happens in our example, meaning our solution is insufficient:
Imports being incorrectly marked by our rule
But this is progress! Despite raising some incorrect warnings, our rule is at least working for our test case, which is a start. Now we just need to make sure we don’t do it for every single string there is.
Attempt #2
Our first attempt doesn’t apply any logic to the nodes being analyzed, so it incorrectly raised problems with import paths. We need to actually check our AstNode (and all its ancestors) passed to the specification in order to exclude imports. Study the analyzer package API, or print details of what you are analyzing and use the custom_lint.log file to identify them yourself as a debugging exploratory solution.
So, after some experimentation, we get to a first working solution for our single test case:
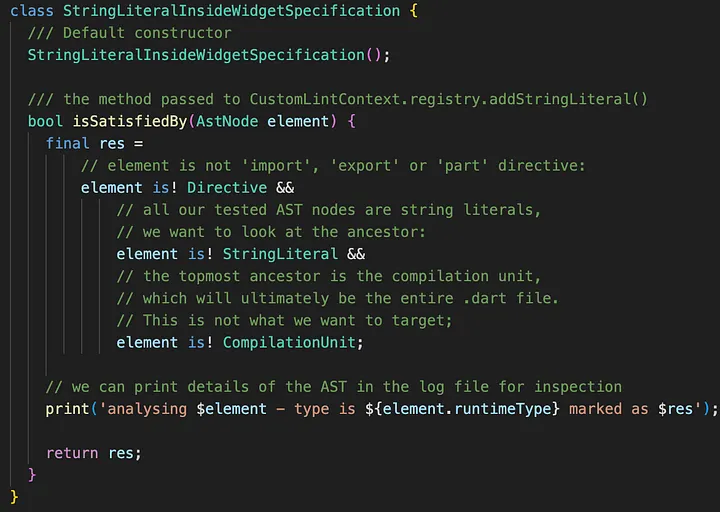
Initial solution for our Specification
Although this may not be entirely clear at first, it makes our test pass, i.e., the string we expected to be marked is correctly done so, while our imports are not anymore.
Refactor
The third step of the TDD mantra is where we finally refine and implement the desired logic. In this step we start to abstract and define our Specifications, in such a way that our test continues to pass.
However, our single test case is too simple for now, so I’ll skip ahead and show what the final Specification looks like after adding more tests and refactoring a few times, and explain how I got there:
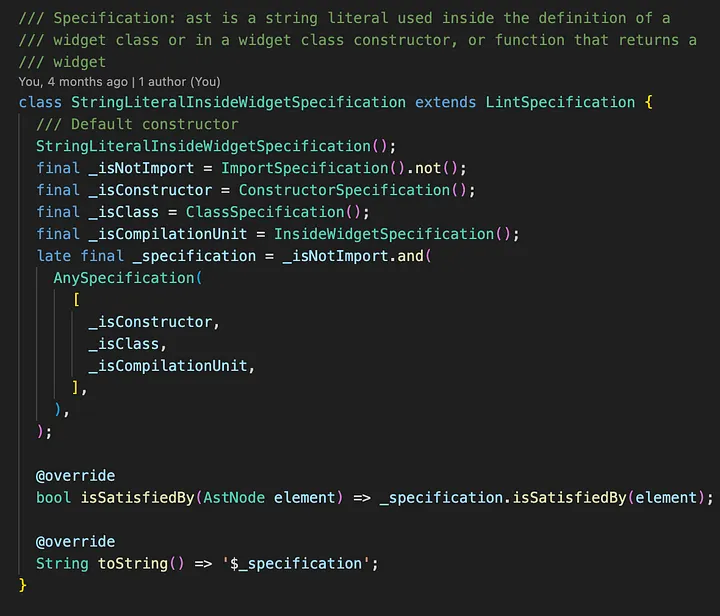
Final definition of our specification
So, our main Specification is now composed of several others, and they work as more readable logical statements. Also, the toString() method will actually return something looking like a WHERE clause on a SQL query, which can be really helpful when you rely on reading the custom_lint.log file. This is what this Specification .toString() method returns:
((NOT Instance of 'ImportSpecification') AND ((Instance of 'ConstructorSpecification' OR Instance of 'ClassSpecification') OR Instance of 'InsideWidgetSpecification'))
Right, but it is still not clear what is happening. All I did is show that this Specification relies on other Specifications to decide whether this should be marked or not as a violation of our rule. What does a lower-level Specification do?
Well, let’s look at one of them, the ImportSpecification:
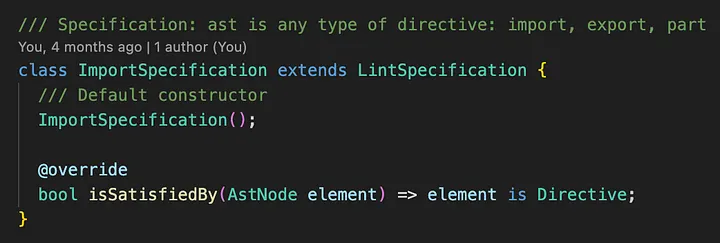
Definition of the ImportSpecification
Simple: it checks for a single piece of the puzzle. In this case, if the AstNode we’re checking at the moment is an import (or even export or part) Directive. This was one of the conditions we had before, but now it has been refactored into its own Specification definition.
And now we need to check if the string is declared inside a Widget or any of its members, such as constructors. Here is the catch: there is no Widget-specific AST!
Extending ASTs
Yet, we can keep readability on our Specifications if we use extension methods on AstNode. For instance, look at our ConstructorSpecification:
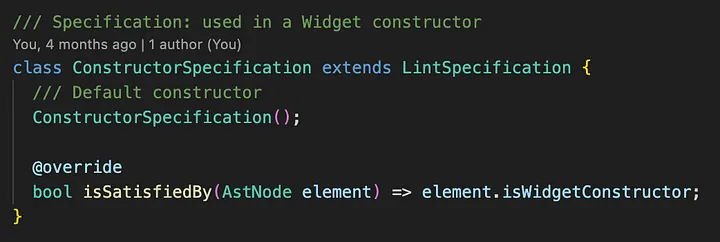
Simple definition of our (Widget) ConstructorSpecification
Our ConstructorSpecification checks if the AstNode is a Widget constructor, by using an extension method we defined. And how do we detect if an AstNode is part of a Widget? We have a helpful issue on the custom_lint repository where Remi Rousselet himself gave us a hint. The answer is to find the build() method on the AST or one of its members. That is, we need now to traverse our AST down to assess its elements.
Finally, after iterating and testing for a while, part of our extensions will look like the following (visit the repository with the entire implementation for further reference):
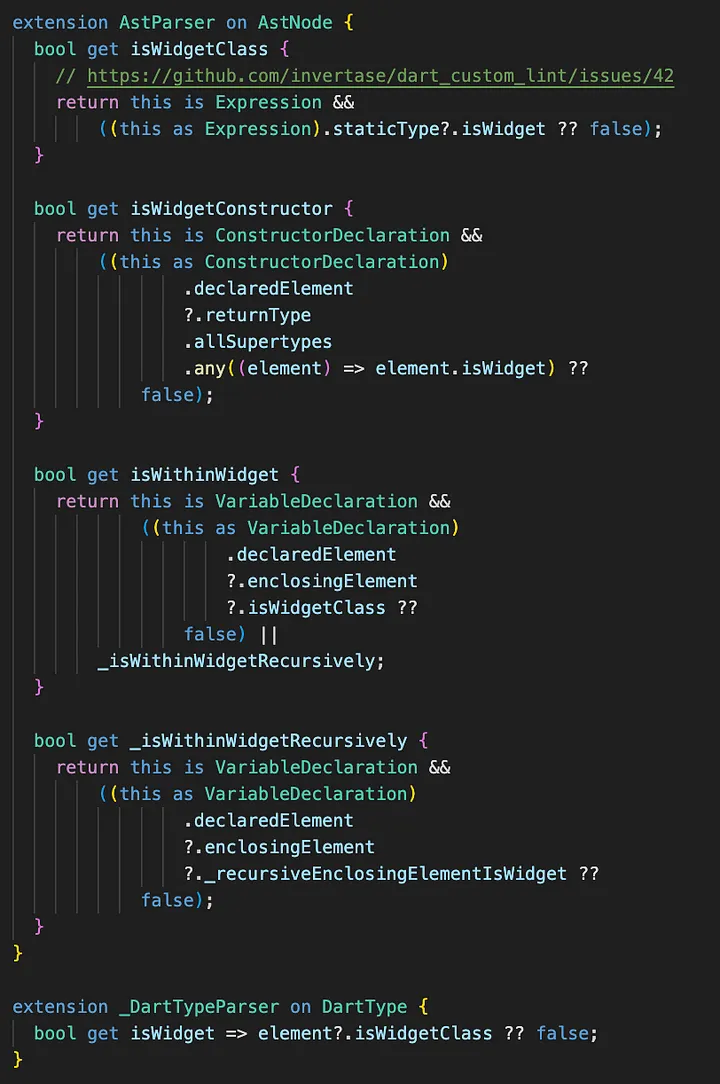
Some of our extensions on AstNode
There is a lot here and it clearly needs a good clean-up, but, nonetheless, it works as we want for this case. Eventually, we can refactor this into more Specifications, but at the moment we leave it as is, since we can leverage these extensions through recursion.
Testing for real
Okay, so we applied the red-green-refactor mantra and got to where we wanted by using the analysis server as a “test framework”. But Dart already has a reliable test framework which we can (and should) be using.
So, how can we do it? It turns out that the DartLintRule class has a method for this: testAnalyzeAndRun(), which takes a File and returns a List of AnalysisError’s. Hence, we can load all Dart files from our sub-project and run them programmatically. A simple way of doing it is:
- Load all Dart files from the sub-project
- Instantiate the plugin rules
- Execute the testAnalyzeAndRun() method of our rule against each file
- Assert the linter errors are what we expected
Therefore, we can make something like the following (this is a simple example that only compares number of matches on each file):
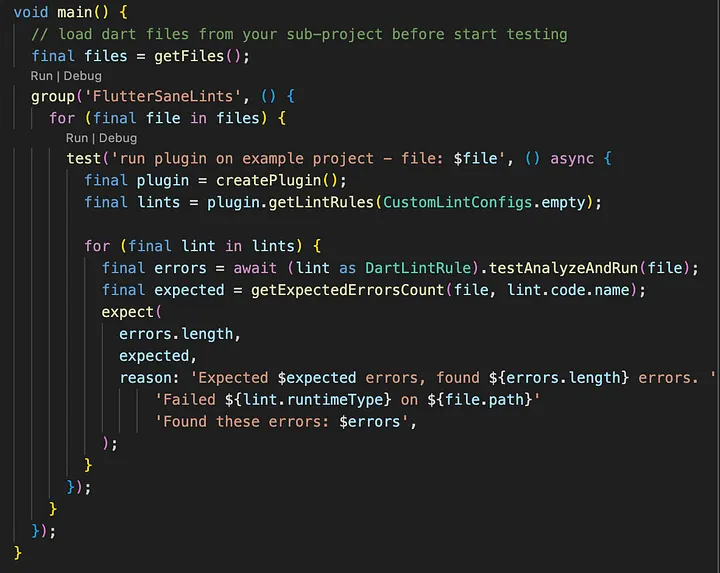
A simple approach for testing a custom lint
Once this is done, testing can be done as usual. Execute the following command and see test cases running:
dart test
Now TDD can be properly applied and even be used on CI/CD workflows.
Conclusion
To recap what we did, the steps to creating a custom lint rule are:
- Create a Dart package with a subdirectory containing an example project that consumes the custom lint
- Apply the TDD mantra of red-green-refactor using the analysis server as a debugging session:
- Red: Create test cases by developing the example project with the code smells you want to discourage. Create the entry point of your lint rule without actually implementing any rule yet. See the analysis server raising warnings with your unmatched expect_lint cases.
- Green: Make them pass somehow. Study the analyzer API. Use the custom_lint.log file to investigate how the analysis server is parsing the ASTs and implement the most basic rule you can to pass the tests. See the analysis server free of warnings.
- Refactor: Clean up your logic without breaking any tests. Create abstractions that make this easier. Use DDD to help.
- Iterate this process while adding more test cases. Increase confidence on your implementation
- Create extensions on ASTs to identify tokens of a narrow niche
- Turn your analysis server tests into real tests. Make them part of your development requirements. Run them constantly. Create CI/CD workflows to ensure they are passing on any code changes.
In conclusion, creating a custom lint rule will take some effort and understanding of the analysis server. But by following the iterative process outlined above and continuously refining your rule, you can develop effective lint rules that promote cleaner, more maintainable code in your Dart projects.